Reliable Data Transfer Protocol
Introduction
This is the summary of the second (and final) coding assignment for the course CS 436 (Networks and Distributed Computer Systems), which I took in my last academic term (Winter 2021) at Waterloo.
In this assignment, I needed to implement a Reliable Data Transfer (RDT) protocol such that a sender could use this protocol to faithfully transfer a text file to a receiver via an unreliable network.
The programming language I used for this assignment is
Java.
(I believe I was one of the few students, perhaps the only one, who used
Java — most others used Python…)
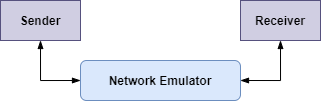
To implement and test this protocol, I had to write the following three programs:
- Sender
- Receiver
- Network Emulator
Reliable Data Transfer (RDT) Protocol
The RDT protocol needs to:
- handle network errors (i.e., packet loss)
- packet reordering
- duplicate packets
For simplicity, this protocol is unidirectional:
- Text file data will only flow from the sender to the receiver.
- The acknowledgments (ACKs) will only flow from the receiver to the sender.
When the sender wants to send packets to the receiver, he/she will send
them to the network emulator instead of the receiver directly.
Then, the network emulator will send those packets to the receiver.
However, the network emulator may discard the packets randomly.
Similarly, the receiver will send ACKs to the network emulator, the
network emulator will then send those ACKs to the sender.
The network emulator will also discard those ACKs randomly.
Packet class
All packets transferred between the sender and the receiver will have the following structure:
int type;
int seqnum;
int length;
String data;
type represents the type of the packet. It can be set to
either 0, 1, or 2, which are defined as follows:
- an ACK packet
- a data packet
- end-of-transmission (EOT) packet
seqnum represents the sequence number of the packet.
The first packet should have seqnum = 0.
length is the number of characters in the
data field.
The range of it is between 0 and 500 (inclusive).
For ACK or EOT packet, the length should be 0.
To allow different programs to receive the same type of object, the
Packet class needs to implement the
Serializable interface and set the variable
serialVersionUID.
To create a Packet object for a data packet, we do
Packet packet = new Packet(int type, int seqnum, String data);
To create a Packet object for an ACK or EOT packet, we do
Packet packet = new Packet(int type, int seqnum);
UDP class
The UDP class will establish a UDP connection between a
sender and a receiver by using the DatagramSocket class
from the java.net packet.
To create a UDP object, we do either
UDP udp = new UDP(String destIP, String destPort, String sourcePort);
or
UDP udp = new UDP(String destIP, String destPort, String sourcePort, int timeout);
where
destIPis the the destination IP address,-
destPortis the port number used by the destination, -
sourcePortis the port number used by the source, and -
timeoutis the timeout of a packet (optional, default value is 0)
The UDP class will convert both destPort and
sourcePort into integers.
If either one of them is not an integer and between 0 and 65535
(inclusive), an error will be returned.
If the IP address for the destination host cannot be found, an error will also be returned.
After creating a UDP object, we can start the UDP
connection between the source and the destination.
udp.startConnection();
Then, we can start sending packets from the source to the destination or receiving packets from the destination to the source.
To send a packet, we do
udp.send(Packet packet);
When sending a Packet object, UDP will first convert it
into an array of bytes.
Then, the array of bytes will be encapsulated into a
DatagramPacket object from the
java.net packet.
Lastly, the DatagramPacket object will be sent out.
To receive a packet, we do
Packet receivedPacket = udp.receive();
The UDP object will wait for a
DatagramPacket object to arrive infinitely if
timeout = 0.
Otherwise, after the amount of timeout, if no
DatagramPacket object arrives, the UDP object
will stop receiving any packet.
When a DatagramPacket object arrives, the
UDP object will decapsulate it to a
Packet object.
To close the UDP connection, we do
udp.closeConnection();
Sender Program
To execute the sender program, we need the following
command-line arguments:
- The host address of the network emulator
- The UDP port number used by the emulator to receive data from the sender
- The UDP port number used by the sender to receive ACK packets from the network emulator
- The timeout interval in units of milliseconds
- The name of the file to be transferred
After executing the sender program with those 5 arguments, the program
will first open the text file and convert it into a sequence of
Packet objects.
Then, it will create a UDP object using the first 4
arguments to start sending data packets and receiving ACK packets.
Note that the RDT protocol is pipelined — meaning the sender program can
send at most 30 packets simultaneously.
Thus, we need to create 30 threads and do multi-threading here.
Each thread will send one data packet and receive one ACK packet (or
receive nothing if timeout).
If the corresponding ACK packet is not received, the data packet will be
re-transferred and reset the timer.
Note that, for example, if thread 1 sends a data packet with
seqnum = 1, it may receive an ACK packet with
seqnum ≠ 1.
Hence, instead of using the RunnableRunnable interface, I
used the Callable interface here.
By using the Callable interface here, each thread can
return the received packet (or nothing) back to the main thread.
Then, the main thread can control which threads should re-transfer the
data packet, and determine which threads have finished their tasks.
This allows the sender program to resend the data packet if the
corresponding ACK packet does not arrive within the timeout period.
Moreover, this can ensure
reliable transmission and
congestion control for the RDT
protocol.
Once all the data packets have been sent and all corresponding ACK
packets have been received, the sender program will send an EOT
packet.
When the corresponding ACK packet for that EOT packet arrives, the
sender program will close the UDP connection and terminates itself.
When the sender program sends out a packet, it will record the packet’s
sequence number into a log file, seqnum.log.
When the sender program receives an ACK packet, it will record the ACK
packet's sequence number into a log file, ack.log.
Receiver Program
To execute the receiver program, we need the following
command-line arguments:
- the hostname for the network emulator
- the UDP port number used by the network emulator to receive ACKs from the receiver
- the UDP port number used by the receiver to receive data from the network emulator
- the name of the file into which the received data is written
After executing the receiver program with those 4
arguments, the program will create a UDP object using the
first 3 arguments and start receiving data packets and sending ACK
packets.
When a data packet arrives, the receiver program will send
an ACK packet where the seqnum is the same as the received
data packet.
Then, it will store the data packet into a dictionary where the key is
the seqnum and the value is the data.
By doing that, we do not need to worry about the received order of the
data packets.
If a duplicate packet arrives, the receiver program will
send a corresponding ACK packet but will not add that duplicate packet
into the dictionary.
Once an EOT packet arrives and the receiver program sends a
corresponding EOT packet, the receiver program will close
the UDP connection.
Then, it will read all values from the dictionary in order and save them
into a text file where the file name is defined by the last command-line
argument.
When the receiver program receives a data packet, it will
record the packet's sequence number into a log file,
arrival.log.
Network Emulator
To execute the network emulator program, we need the
following command-line arguments:
- the receiver's network address
- the receiver's receiving UDP port number
- the receiving UDP port number in the receiver direction
- the sender's network address
- the sender's receiving UDP port number
- the receiving UDP port number in the sender direction
- the packet discard probability
- the verbose-mode
The verbose mode is either 0 or 1.
If it is set to 1, then the network emulator program will
display its internal processing one per line.
Once we execute the network emulator program, it will build
two UDP connections - one connects to the sender and one connects to the
receiver.
When the network emulator program receives a data packet
from the sender, it will drop the packet with the specified probability
(depends on the second last command-line argument).
If the packet is not dropped, then the
network emulator program will send it to the receiver.
Similarly, when the network emulator program receives an
ACK packet from the receiver, it will drop the packet with the specified
probability (depends on the second last command-line argument).
If the packet is not dropped, then the
network emulator program will send it to the sender.
However, the EOT packet from both sender and receiver will never be discarded.
For the network emulator program, we need to create two
threads and do multi-threading.
The first thread will receive a packet from the sender, then transfer it to the receiver if the packet is not dropped.
The second thread will receive a packet from the receiver, then transfer it to the sender if the packet is not discarded.
Demo
The following video is a demo of this project.
In this demo, I run the network emulator program, the
receiver program, and the sender program in
the Waterloo CS Undergrad Environment (where the course professor and
TAs test and mark my programs).
The left window is the network emulator program, the top
right window is the receiver program, and the bottom right
window is the sender program.
I run the network emulator program in the machine
ubuntu1804-010 and I run the other two programs in the
machine ubuntu1804-002.
Note that in general, those three programs should be run on three
different machines.
However, when I recorded this video (in May), only two machines were
available.
But when I tested and submitted this project in March, those programs
had run on three different machines for sure.